


Quick answer
What this guide helps you do
A simple home server backup strategy built around 3-2-1, automatic copies, offsite protection, and tested restores.
Backup hardware to consider
A separate physical backup target can improve a 3-2-1 plan, but the important part is failure separation and tested restores, not the brand on the drive.
A separate local copy for the 3-2-1 plan. Keep it apart from the server and test restores, as this guide explains.
A quieter, faster option for a local backup copy.
Handy for reading or cloning spare SATA drives during recovery.
Quick answer
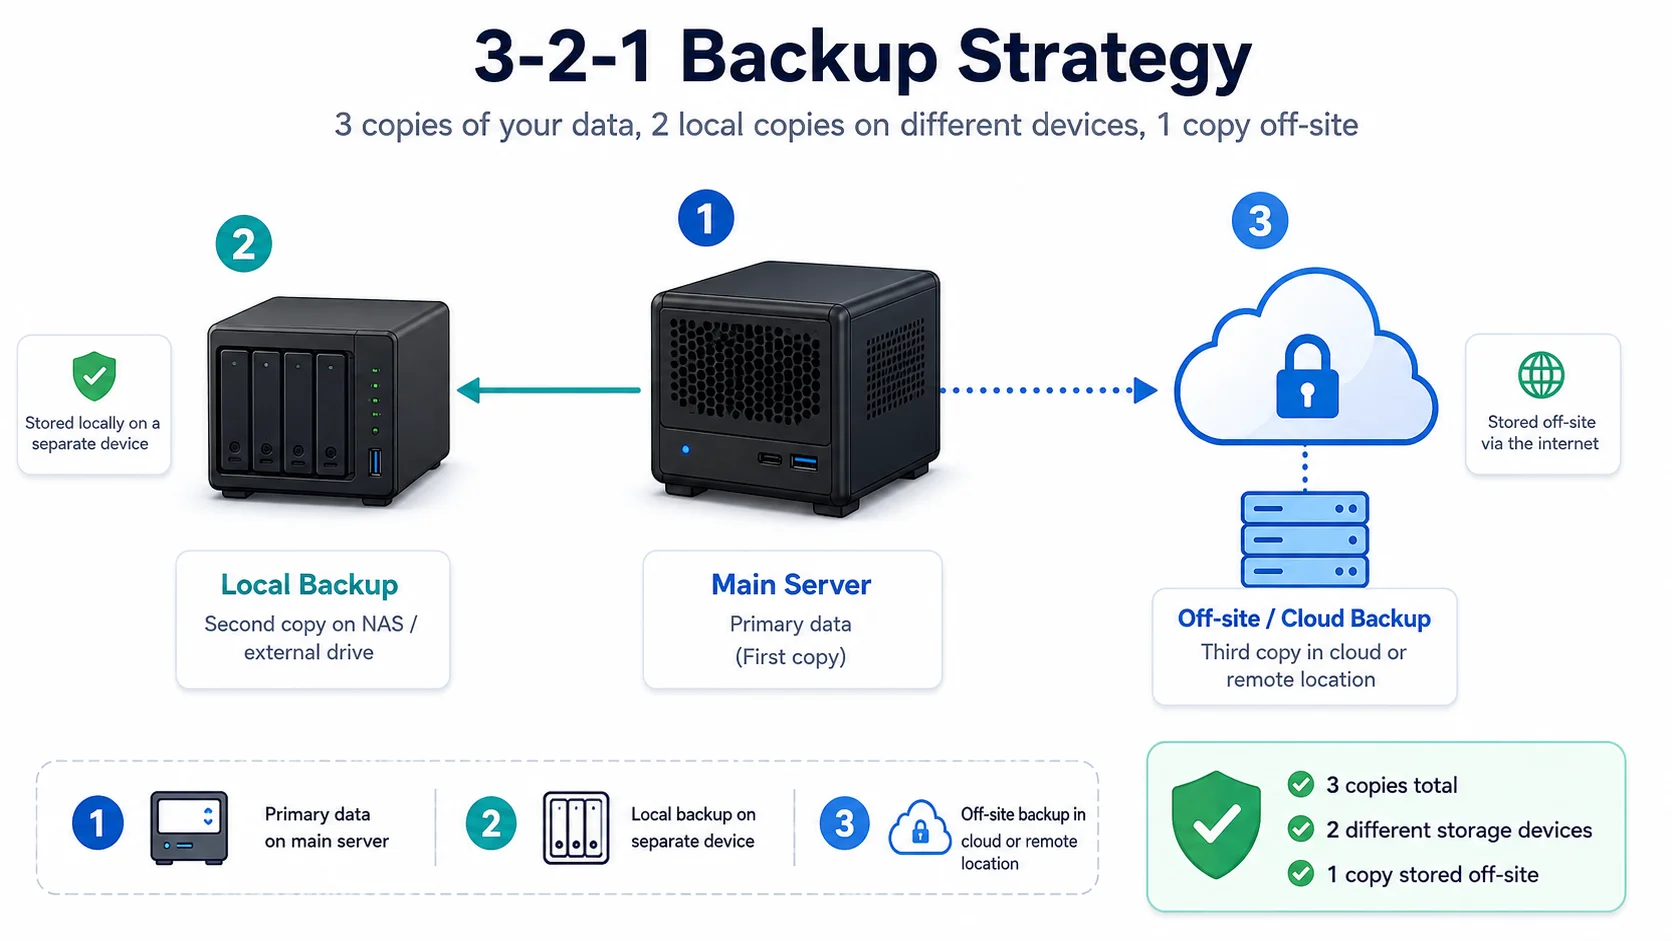
A practical 3-2-1 home-server backup plan is:
Primary copy: live data on the server
Second copy: automatic local backup on another disk or machine
Third copy: encrypted cloud backup or rotated disk stored elsewhere
Proof: regular restore tests
The target is not three folders on the same disk. The copies must fail differently.
If you have never restored from the backup, treat it as unverified.
What this guide covers
This guide focuses on recoverable backups for a small Linux home server.
It covers:
- deciding what deserves backup protection
- separating live data from backup copies
- creating a local
rsyncbackup - adding encrypted offsite protection with
restic - retention and pruning
- logging and failure detection
- testing local and offsite restores
- documenting the recovery process
Snapshots are useful before risky changes, but they are not a replacement for separate backup copies.
SmallGrid verification method
SmallGrid treats a backup as verified only when all four layers have been checked:
- the source data is known
- the backup job finishes and logs its result
- the destination contains the expected files or snapshots
- a selected file or folder can be restored to a temporary location and opened
The examples use generic paths so they can be adapted safely. Do not copy device names such as /dev/sdX without checking your own system.
Backup decision table
| Data type | Priority | Suggested protection | Restore test |
|---|---|---|---|
| Photos and personal documents | Critical | Local automatic backup plus encrypted offsite copy | Restore a representative folder quarterly |
| Docker Compose, environment files and scripts | Critical | Versioned local and offsite backup | Rebuild one service in a test location |
| Application databases and configuration | High | Consistent scheduled backup with retention | Restore into a temporary test instance |
| Proxmox VM backups | High | Separate storage plus offsite copy where practical | Restore one VM or configuration periodically |
| Jellyfin metadata and watch state | Medium | Local scheduled backup | Restore the Jellyfin config directory in a test copy |
| Replaceable media | Low to medium | Protect only when re-creating it would be costly | Restore a sample if included |
| Cache, downloads and temporary files | Low | Usually exclude | No restore test required |
SmallGrid rule: back up what hurts to lose first.
Understand 3-2-1 properly
The classic rule is:
- 3 copies of important data
- 2 different storage systems or failure domains
- 1 copy away from the main server
A poor example is:
/srv/data
/srv/data-backup
/srv/data-copy
when all three directories are on the same physical disk.
A better example is:
Live data:      internal server storage
Local backup:   separate USB disk or another machine
Offsite backup: encrypted cloud repository or rotated disk elsewhere
Step 1: Inventory the data
Before choosing tools, identify the source paths:
sudo du -sh /srv/* 2>/dev/null
sudo find /srv -maxdepth 3 -type f | head -50
Create a simple inventory:
| Source | Contains | Priority | Backup target |
|---|---|---|---|
/srv/data | documents and projects | Critical | local plus offsite |
/srv/docker | Compose and service config | Critical | local plus offsite |
/var/lib/jellyfin | metadata and watch state | Medium | local backup |
/srv/media | replaceable media | Depends | selective or no backup |
Do not start with the largest directory. Start with the data that cannot be recreated.
Step 2: Prepare a separate local destination
Identify the backup disk:
lsblk -o NAME,SIZE,FSTYPE,MODEL,MOUNTPOINTS
blkid
Be careful: formatting the wrong disk destroys data.
Create a stable mount point:
sudo mkdir -p /mnt/backupFor a permanently attached disk, mount by UUID in /etc/fstab rather than relying on /dev/sdX remaining stable.
Validate the mount:
sudo mount -a
findmnt /mnt/backup
Do not run a destructive or --delete backup until findmnt confirms the expected destination is mounted.
Step 3: Create a safer local backup script
Create the script:
sudo nano /usr/local/sbin/backup-data.shUse:
#!/usr/bin/env bash
set -euo pipefail

SRC="/srv/data/"
DEST="/mnt/backup/data/"
LOG="/var/log/backup-data.log"

stamp() {
  date +"%Y-%m-%d %H:%M:%S"
}

if ! findmnt -M /mnt/backup >/dev/null 2>&1; then
  echo "$(stamp) - ERROR: /mnt/backup is not mounted" | tee -a "$LOG"
  exit 1
fi

mkdir -p "$DEST"

echo "$(stamp) - Starting local backup" | tee -a "$LOG"

rsync -aHAX --delete \
  --numeric-ids \
  --exclude=".cache/" \
  --exclude="*.tmp" \
  "$SRC" "$DEST" | tee -a "$LOG"

echo "$(stamp) - Local backup finished" | tee -a "$LOG"
Make it executable:
sudo chmod 750 /usr/local/sbin/backup-data.shThe mount check prevents rsync --delete from writing into an empty mount-point directory when the backup disk is absent.
Step 4: Test the local backup manually
Run it once:
sudo /usr/local/sbin/backup-data.shCheck the destination and log:
findmnt /mnt/backup
sudo find /mnt/backup/data -maxdepth 3 -type f | head -20
sudo tail -n 50 /var/log/backup-data.log
Compare source and destination totals:
sudo du -sh /srv/data /mnt/backup/dataThe totals do not need to be byte-for-byte identical in every filesystem, but a large unexplained difference needs investigation.
Step 5: Schedule the backup
A systemd timer provides clearer status than a silent cron job.
Create the service:
sudo nano /etc/systemd/system/backup-data.service[Unit]
Description=Back up important server data
RequiresMountsFor=/mnt/backup
[Service]
Type=oneshot
ExecStart=/usr/local/sbin/backup-data.shCreate the timer:
sudo nano /etc/systemd/system/backup-data.timer[Unit]
Description=Run the local data backup nightly
[Timer]
OnCalendar=*-*-* 02:30:00
Persistent=true
RandomizedDelaySec=10m
[Install]
WantedBy=timers.targetEnable it:
sudo systemctl daemon-reload
sudo systemctl enable --now backup-data.timer
systemctl list-timers backup-data.timer
Check a completed run with:
systemctl status backup-data.service --no-pager
journalctl -u backup-data.service --no-pager -n 100
Step 6: Add an encrypted offsite copy
Offsite protection covers failures that affect the server and local backup together.
Practical options include:
- encrypted object storage using
restic - another trusted machine in a different location
- a rotated USB disk stored elsewhere
- a dedicated backup provider
This example uses restic because it provides encryption, snapshots, retention, and restore tools.
Install it:
sudo apt update
sudo apt install -y restic
Store repository credentials in a protected environment file:
sudo nano /root/.restic-env
sudo chmod 600 /root/.restic-env
Example variables:
export RESTIC_REPOSITORY="s3:https://YOUR-ENDPOINT/YOUR-BUCKET"
export RESTIC_PASSWORD_FILE="/root/.restic-password"
export AWS_ACCESS_KEY_ID="YOUR-KEY"
export AWS_SECRET_ACCESS_KEY="YOUR-SECRET"
Store the repository password in /root/.restic-password with mode 600. Keep a protected copy of that password away from the server. An encrypted repository without its password is unrecoverable.
Initialise the repository:
sudo -i
source /root/.restic-env
restic init
exit
Step 7: Back up and retain snapshots
Create the offsite script:
sudo nano /usr/local/sbin/backup-offsite.sh#!/usr/bin/env bash
set -euo pipefail
source /root/.restic-env
LOG="/var/log/backup-offsite.log"
restic backup /srv/data /srv/docker \
--tag smallgrid-server | tee -a "$LOG"
restic forget \
--keep-daily 7 \
--keep-weekly 4 \
--keep-monthly 6 \
--prune | tee -a "$LOG"
restic check | tee -a "$LOG"Make it executable and test it manually:
sudo chmod 750 /usr/local/sbin/backup-offsite.sh
sudo /usr/local/sbin/backup-offsite.sh
List snapshots:
sudo -i
source /root/.restic-env
restic snapshots
exit
Run offsite backups at a frequency that matches how often the protected data changes.
Step 8: Test a local restore
Create a temporary restore location:
sudo mkdir -p /tmp/local-restore-test
sudo rsync -aHAX /mnt/backup/data/projects/example/ /tmp/local-restore-test/
Inspect and open the restored data:
sudo find /tmp/local-restore-test -maxdepth 3 -type f
sudo stat /tmp/local-restore-test/*
Check:
- the expected files exist
- permissions and ownership are sensible
- files can be opened
- an application can read the restored data where relevant
Delete only the temporary restore copy when finished.
Step 9: Test an offsite restore
List snapshots and restore a small path:
sudo -i
source /root/.restic-env
restic snapshots
restic restore latest \
  --target /tmp/restic-restore-test \
  --include "/srv/data/projects/example"
exit
Inspect the result:
sudo find /tmp/restic-restore-test -maxdepth 5 -type fA successful restic check is useful, but it does not replace restoring and opening actual files.
Worked verification record
Record restore tests in a simple table:
| Date | Backup source | Restored item | Destination | Result | Notes |
|---|---|---|---|---|---|
| 2026-07-09 | local USB backup | test project folder | /tmp/local-restore-test | Pass or fail | Record permissions and application check |
| 2026-07-09 | offsite restic snapshot | same test folder | /tmp/restic-restore-test | Pass or fail | Record snapshot ID and errors |
Use your real date and result. Do not mark a test as passed until the restored files have been opened or used.
Failure scenarios to test
| Failure | Expected recovery source |
|---|---|
| Main data disk fails | Local or offsite backup |
| Accidental deletion | Versioned offsite snapshot or retained local copy |
| Local backup disk fails | Offsite copy |
| Server is stolen or damaged | Offsite copy plus documented rebuild steps |
| Bad configuration deployment | Configuration backup or tested snapshot |
| Backup job silently stops | Monitoring, logs, and regular restore review |
| Ransomware or destructive command affects mounted storage | Offline, immutable, or separately protected offsite copy |
A permanently attached local disk is convenient, but it may share some risks with the server. That is why the offsite copy matters.
Final verification checklist
- Important source paths are documented.
- The local destination is a separate disk or machine.
- The backup script refuses to run when the destination is not mounted.
- Automatic runs have visible status and logs.
- At least one copy is away from the main server.
- Offsite backups are encrypted.
- The encryption password is stored separately and securely.
- Retention rules keep more than only the latest state.
- A local file or folder has been restored and opened.
- An offsite file or folder has been restored and opened.
- The recovery steps are documented somewhere outside the server.
- Restore tests are repeated on a schedule.
Common mistakes
Copying to the same physical disk
A second directory is not protection from disk failure.
Using --delete without checking the mount
An absent destination disk can turn the mount point into a normal empty directory. Always verify the mount first.
Backing up live databases inconsistently
Some applications need database dumps, application-aware exports, or a short service stop to produce a consistent backup.
Keeping only one current copy
Mirrors reproduce deletion and corruption. Versioned snapshots provide a route back to an earlier state.
Never checking logs
A backup job that silently fails creates false confidence.
Never testing restore
A restore test is the difference between a backup system and a collection of unproven files.
Confusing snapshots with backups
Snapshots are useful for rollback, but they usually share storage and failure risks with the original data.
Read Proxmox Snapshots vs Backups: What Beginners Get Wrong.
Related guides
- Proxmox Snapshots vs Backups: What Beginners Get Wrong
- Safe Experiments: Snapshots and Test Environments for Your Homelab
- Proxmox for Normal Humans: One-Node Starter Setup
- Jellyfin on Ubuntu: Low-Power Setup and Folder Permissions
- How to Measure Homelab Power Usage Properly
Recap
A practical 3-2-1 backup system has live data, a separate local copy, an offsite copy, version history, visible logs, and tested restores.
Start with the data that cannot be recreated. Automate the local copy, add encrypted offsite protection, and regularly restore a representative folder to prove the system still works.