


Quick answer
What this guide helps you do
Find the exact reason Jellyfin is transcoding. Check the dashboard, playback information, codecs, subtitles, audio, bitrate limits, logs, and hardware acceleration step by step.
Jellyfin beginner path
New to Jellyfin? Follow this order.
These guides form the SmallGrid Jellyfin path: install it, fix folder access, solve empty libraries, reduce unnecessary transcoding, then choose the right mini PC.
Quick answer
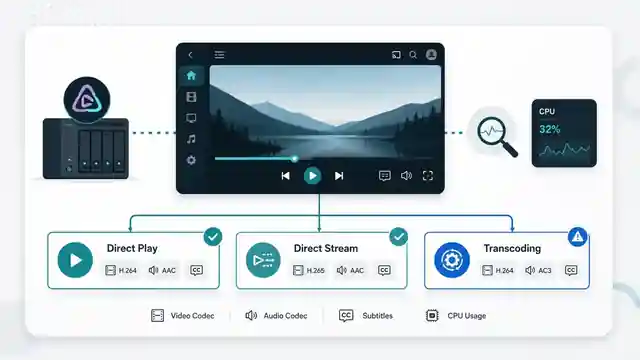
Play the problem file, open the Jellyfin dashboard, and inspect the active playback session before changing anything.
The session should show one of these states:
Direct Play
Direct Stream
Transcoding
If Jellyfin is transcoding, record the reason shown for that session. Then change one variable at a time: subtitles, audio track, quality limit, client, and file format.
Do not assume high CPU usage proves video transcoding, and do not replace the server before identifying the actual trigger.
What this guide covers
This is the diagnostic guide for a specific Jellyfin playback session.
It helps you answer:
- whether the file is Direct Playing, Direct Streaming, or Transcoding
- which stream is being converted
- whether subtitles are forcing video burn-in
- whether the audio format is unsupported
- whether the client quality limit is reducing bitrate or resolution
- whether the container alone is being repackaged
- whether required transcoding is using hardware acceleration
It does not repeat the full setup process for Intel Quick Sync, VAAPI, NVENC, or other hardware acceleration methods. Use Jellyfin Hardware Transcoding on Ubuntu after you have proved that conversion is genuinely required.
Jellyfin menu wording can vary slightly between server and client versions, but the evidence you need is the same: playback mode, conversion reason, stream details, and server logs.
SmallGrid verification method
Use the same test file, client, user account, and scene for every comparison.
Record this before making changes:
Client:
Connection: local or remote
Playback mode:
Video codec:
Audio codec:
Subtitle format:
Resolution:
Bitrate:
Selected quality:
Reported transcode reason:
Hardware acceleration active: yes / no / unknown
Then change only one item and replay the same scene.
This produces useful evidence instead of a collection of unrelated guesses.
Playback mode decision table
| Jellyfin status | What is happening | Server cost | First action |
|---|---|---|---|
| Direct Play | The client receives the original container and streams | Lowest | No fix is normally required |
| Direct Stream | Jellyfin repackages compatible streams into another container | Low | Check container support before converting the file |
| Audio transcoding | Video remains compatible but audio is converted | Usually moderate or low | Try another audio track or add a compatible track |
| Video transcoding | Video is decoded and re-encoded | Highest | Read the stated reason before checking acceleration |
| Subtitle burn-in | Video is re-encoded so subtitles can be drawn into the image | High | Disable subtitles or use a compatible text track |
| Bitrate or resolution conversion | Jellyfin creates a smaller or lower-resolution stream | Variable | Check client quality limits and remote bandwidth |
Direct Stream is not the same as full video transcoding. If only the container changes, the server may use very little CPU.
Read Jellyfin Direct Stream vs Direct Play for the container-specific explanation.
Step 1: Inspect the active playback session
Start playback on the device that shows the problem.
Then:
- Open Jellyfin in a browser using an administrator account.
- Open Dashboard.
- Find the active user session.
- Expand the session or playback details if available.
- Record the playback mode.
- Record every transcode reason shown.
Common reasons include:
Video codec not supported
Audio codec not supported
Subtitle format not supported
Subtitle burn-in required
Bitrate exceeds client limit
Resolution exceeds client limit
Container not supported
Video profile or level not supported
Treat the displayed reason as the starting hypothesis, not the entire investigation. Some sessions have more than one incompatible stream.
Step 2: Confirm whether video is actually being re-encoded
A session labelled Transcoding may involve:
- video and audio conversion
- audio-only conversion
- subtitle burn-in
- resolution reduction
- bitrate reduction
Check the playback information for the output video and audio codecs.
A practical clue is server load, but it is supporting evidence only:
htopFor Docker, identify the container load with:
docker stats jellyfinLow CPU use can mean:
- Direct Stream
- audio-only transcoding
- successful hardware-accelerated video transcoding
- a paused or buffered session
High CPU use can mean software video transcoding, but CPU use alone does not explain why Jellyfin started the conversion.
Step 3: Disable subtitles and retest
Turn subtitles off and replay the same scene.
Then inspect the dashboard again.
| Result after disabling subtitles | Likely conclusion |
|---|---|
| Transcoding changes to Direct Play | Subtitle track caused the conversion |
| Transcoding changes to Direct Stream | Subtitle handling or container interaction caused the heavier conversion |
| Playback mode does not change | Continue to audio, quality, and codec checks |
Image-based subtitles such as PGS or VobSub often require burn-in on clients that cannot render them directly.
Text subtitles such as SRT are usually easier for clients to handle, but support still depends on the application and playback method.
Use Jellyfin Subtitles Causing Transcoding for the subtitle-specific fixes.
Step 4: Change the audio track
A compatible video stream can still trigger audio conversion.
Try another audio track, replay the same scene, and inspect the session again.
Common client-specific trouble formats include:
- DTS
- DTS-HD
- TrueHD
- E-AC-3
- multichannel audio layouts unsupported by the device
AAC and AC-3 are commonly useful compatibility tracks, but no audio format is universal across every browser, television, streaming stick, receiver, and application.
If changing only the audio track removes transcoding, the server hardware and video codec were not the original problem.
Step 5: Check the client quality limit
A client can force transcoding even when it supports the original codecs.
For local playback, set the client quality to the original or maximum available setting.
Typical wording includes:
Original
Auto
Maximum
For remote playback, compare:
- source bitrate
- client quality limit
- Jellyfin remote bitrate limit
- available home upload speed
- available download speed at the client
A 40 Mbps source cannot be sent unchanged when the client is limited to 8 Mbps. Jellyfin must reduce the stream or playback may fail.
Do not raise remote quality limits beyond the connection that must carry the stream.
Step 6: Test the same file on another client
Use the same Jellyfin server and file, but change the playback application or device.
Useful comparisons include:
- web browser vs Jellyfin Media Player
- smart-TV app vs Android TV or Fire TV device
- phone app vs mobile browser
- local network vs remote connection
Record the result in a simple table:
| Client | Connection | Subtitles | Audio track | Quality | Result |
|---|---|---|---|---|---|
| Living-room TV app | Local | PGS | TrueHD | Original | Video transcode |
| Jellyfin Media Player | Local | Off | TrueHD | Original | Direct Play |
| Browser | Local | Off | AAC | Original | Direct Stream |
If one client Direct Plays and another transcodes, the difference is normally client capability, playback settings, or subtitle rendering rather than the media server itself.
Step 7: Inspect the file with ffprobe
The file extension does not tell you everything inside the file.
Run:
ffprobe -hide_banner "Film Name.mkv"For a concise stream listing:
ffprobe \
  -v error \
  -show_entries stream=index,codec_type,codec_name,profile,width,height,channels,channel_layout \
  -show_entries format=format_name,bit_rate,duration \
  -of default=noprint_wrappers=1 \
  "Film Name.mkv"
Check:
- container
- video codec
- codec profile and level
- resolution
- HDR or colour format where relevant
- audio codec
- channel layout
- subtitle codec
- total bitrate
Then compare the exact combination with the client result rather than relying on a statement such as “the television supports HEVC”. A device may support HEVC but reject a particular profile, bit depth, HDR format, audio track, subtitle track, or container.
Read Best Video Format for Jellyfin Direct Play for format-selection guidance.
Step 8: Check the Jellyfin logs
Use logs after you have captured the dashboard reason.
For a native Ubuntu service:
sudo journalctl -u jellyfin --since "10 minutes ago" --no-pagerTo follow new messages while starting playback:
sudo journalctl -u jellyfin -fFor Docker:
docker logs --since 10m jellyfinTo follow the container logs:
docker logs -f jellyfinLook for:
- the FFmpeg command used for the session
- selected video decoder and encoder
- subtitle filters
- scale filters
- tone-mapping filters
- VAAPI, Quick Sync, NVENC, CUDA, or device errors
- permission errors for hardware devices
- unsupported codec, profile, or pixel-format messages
- FFmpeg exiting unexpectedly
Avoid copying an entire log into a public forum without checking it for usernames, file paths, addresses, tokens, or other private details.
Step 9: Confirm hardware acceleration only when conversion is necessary
Once you have proved that the client cannot Direct Play the selected combination, check whether the required video conversion is accelerated.
On Intel or AMD Linux systems using VAAPI, inspect available devices:
ls -l /dev/driFor Docker, confirm that the device is visible inside the container:
docker exec jellyfin ls -l /dev/driCheck the active process on the host:
ps aux | grep -E '[f]fmpeg|[j]ellyfin'Then compare the Jellyfin log with the configured acceleration method.
Typical failure categories are:
| Evidence | Likely issue |
|---|---|
FFmpeg uses a software encoder such as libx264 unexpectedly | Hardware acceleration is disabled, unsupported, or failed |
/dev/dri missing in the container | Device was not passed through |
| Permission denied for render device | Jellyfin user or container lacks access |
| Hardware decoder starts but FFmpeg exits | Codec, profile, driver, filter, or device limitation |
| Hardware acceleration works for H.264 but not another codec | Hardware generation or selected method lacks support |
Do not enable every hardware option at once. Enable only the codecs and features your hardware can actually process.
Step 10: Separate the cause from the optimisation
These are different questions:
- Why did Jellyfin decide to transcode?
- Is the required transcode running efficiently?
Examples:
| Cause | Optimisation |
|---|---|
| PGS subtitle burn-in | Use text subtitles or a client that renders PGS |
| Unsupported TrueHD audio | Select or add AAC/AC-3 compatibility audio |
| Remote bitrate limit | Increase the limit only when bandwidth supports it |
| Unsupported HEVC profile | Use a compatible client or convert the file |
| Required video conversion | Configure supported hardware acceleration |
Hardware acceleration can make a necessary transcode faster. It does not make an incompatible client Direct Play the original file.
Worked diagnosis: 4K film transcodes on one television
Example observation:
File: MKV
Video: HEVC Main 10, 3840x2160
Audio: TrueHD 7.1 and AC-3 5.1
Subtitles: PGS
Client: smart-TV Jellyfin app
Quality: Original
Result: Transcoding
Test sequence:
- Play with PGS subtitles enabled: video transcodes.
- Disable subtitles: session changes, but audio still transcodes.
- Select the AC-3 track: session changes to Direct Play.
- Repeat the same scene to confirm the result.
Conclusion:
Primary video-transcode trigger: PGS subtitle burn-in
Remaining audio-transcode trigger: TrueHD incompatibility
Server replacement required: no
File conversion required: no, because compatible tracks already exist
This is why changing one variable at a time is more useful than enabling hardware acceleration first.
Exact troubleshooting order
Use this sequence:
- Play the problem file on the problem client.
- Read and record the active-session playback mode.
- Record every stated transcode reason.
- Disable subtitles and retest.
- Select another audio track and retest.
- set local quality to Original or maximum and retest.
- Test the same file on another client.
- Inspect the file with
ffprobe. - Read the relevant Jellyfin and FFmpeg log entries.
- Check hardware acceleration only if video conversion is still required.
- Repeat the original test to verify the final change.
Common mistakes
Replacing the server before checking the client
A more powerful server can process transcoding faster, but it does not remove a client compatibility problem.
Converting the entire library
Test representative files on the devices you actually use before starting a bulk conversion.
Treating Direct Stream as a failure
Container repackaging is normally much lighter than video re-encoding.
Enabling every hardware codec option
Unsupported options can create new playback failures and make diagnosis harder.
Testing several changes at once
If you disable subtitles, change the audio track, raise the bitrate limit, and switch clients together, you will not know which change mattered.
Ignoring remote bandwidth
A file that Direct Plays locally may need conversion over a slower remote connection.
Evidence checklist
Before declaring the issue fixed, confirm:
- the original problem file was retested
- the intended client was used
- the final playback mode was recorded
- subtitles were tested on and off
- the selected audio track was recorded
- quality and bitrate limits were checked
-
ffprobedetails matched the file tested - logs showed no unexpected FFmpeg or hardware errors
- CPU or GPU behaviour matched the final playback mode
- the same result was reproduced more than once
Related guides
- Jellyfin Direct Play vs Transcoding
- Jellyfin Subtitles Causing Transcoding
- Jellyfin Direct Stream vs Direct Play
- Best Video Format for Jellyfin Direct Play
- Jellyfin Hardware Transcoding on Ubuntu
Recap
Start with the active Jellyfin session, not the server specification.
Record the playback mode and stated reason, then test subtitles, audio, quality limits, client support, and the exact file streams one variable at a time.
Only investigate hardware acceleration after you have confirmed that video conversion is genuinely necessary. That separates the compatibility problem from the performance problem and prevents unnecessary file conversion or hardware upgrades.
Jellyfin guide cluster
More Jellyfin fixes and setup guides
These guides link the main Jellyfin setup, permissions, remote access, direct play, and hardware topics together.
Jellyfin 12 Upgrade Guide: 10 Things to Check Before You Update
Prepare Jellyfin 10.10 or 10.11 for version 12: verify backups, plugins, Docker or Ubuntu packages, migrations, permissions, playback and rollback.
How to Reduce Jellyfin Server Power Use on Ubuntu
Reduce Jellyfin server electricity use on Ubuntu by measuring idle and playback power, avoiding unnecessary transcoding, checking background load, storage, CPU behaviour and reboot health.
Give Jellyfin Access to Media Folders on Ubuntu
Fix Jellyfin permission denied errors on Ubuntu. Test the service user, find blocked parent folders, apply safe ACLs, verify inheritance, and check mounted-drive options.
Jellyfin Library Not Showing Files? 8 Checks That Fix It
Fix a Jellyfin library that is empty or missing media. Check mounts, Linux permissions, Docker paths, library folders, naming, scans and logs in the correct order.
Jellyfin Docker Permissions: Fix Media Folder Access and UID/GID Errors
Fix Jellyfin Docker permission denied errors. Check bind mounts, container paths, UID and GID values, read-only media access, active mounts, and file visibility step by step.
Jellyfin Direct Play vs Transcoding: What Is the Difference?
Why is Jellyfin transcoding instead of Direct Playing? Compare Direct Play, Direct Stream and transcoding, CPU usage, quality and common triggers.